Tuesday, November 23, 2010

Made Hiccup dolls to match our Night Furys!!!

If you have seen the movie 'How To Train Your Dragon' then you know that one of the things that makes the movie so good is the relationship developed between viking-in-training Hiccup and Toothless, the Night Fury.


If you saw this post then you know that I have made a Toothless plush for my sons and my nephew.  Well, my mom, sister and I decided that they needed a Hiccup to go with them.

I did some research online tutorials for dolls that I could make work (that would be easy too) and decided on this tutorial.

Here are pics of my result!  I was pleased!  I hope the boys love him!


This is also being posted in Watson Family Christmas

Thursday, November 18, 2010

My Toothless plushies!!

OMG!  I can't believe I finally finished this project!

My nephew's favorite movie right now is How To Train A Dragon.  In fact a few weeks ago they came up and brought the movie and we watched it.  I must say I was pleasantly surprised with the movie.  My boys fell in love with it as well!

So when I found this tutorial to make a Toothless plushie I decided that this needed to be another Christmas present!  This will be my Christmas present to my nephew and I thought to go ahead and make one for each of my boys while I was at it!

This was probably one of the most challenging sewing projects I have done yet!  There were about 25 pattern pieces!!  And some of the steps were difficult to figure out but I did!  And I am glad I stuck with it!

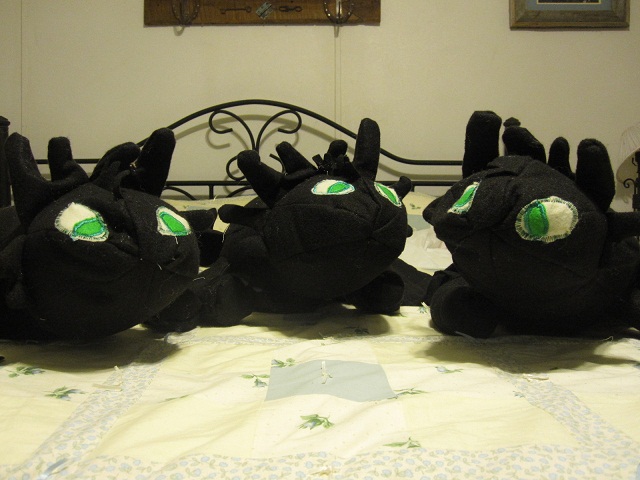
I enlarged the pattern pieces by 200%!!  The final doll is a dimension of 36" from tip of head to tip of tail!  (I found one online for not quite this big for $250!!!)

I can't wait to see their faces on Christmas!  I especially can't wait to see my nephew's reaction when he opens his!!

Here are some pics (they don't do it justice...I am not a good photographer and could not figure out the best way to get photos to show you what these are like!  Yes there are flaws (it is my sewing so there are going to be flaws!) but I still think they are cute!

Oh - and I probably should state I made these with black felt!  Felt is very easy to work with :-) That was a plus for this project!


Here is a full body view - like I said they measure 36" from tip of head to tip of tail.  The wing span is 45"!

Here is a belly shot - sorry it is blurry!


I'm ready for something a wee bit easier! :-)

(I am also posting this is Watson Handmade Christmas)

Tuesday, November 9, 2010

Another Doll :-)

I got another doll for Alyssa made for Christmas!!

I got this pattern from a Pioneer Crafts book I found at the library.  The pattern was for a rag doll.  I decided to use some of Alyssa's receiving blankets from when she was a baby to make the doll out of!

I thought it turned out really well.  Every time she would walk in and see me working on it she would start yelling "baby baby" and wanting to hold it...she couldn't figure out why I wouldn't let her (she doesn't grasp the whole wait until Christmas thing - HA!)  But it's good to know that she wants to hold it!  It will be exciting to watch her open it on Christmas!

Here she is next to the book I used for the pattern:


This post was also posted on Watson Handmade Christmas

Saturday, November 6, 2010

The Cat In The Hat sock puppet

Aaron is in love with the cat in the hat right now!  I thought it would be fun to try to do a sock puppet dressed like the cat in the hat!  Thankfully Aaron spent the afternoon at Granny's this afternoon and I was able to get this made for him!  I can't wait to give this to him on Christmas!!


This is also posted in Watson Handmade Christmas.

Thursday, November 4, 2010

My First Doll

Yeah!  I just finished making my first doll!!!  (the first of 3 different kind I am planning on making for Alyssa for Christmas.  I found the tutorial for this doll here.

 I loved how her hair turned out!!
 Here is what she looks like without her dress on.
Like I said, I will be making a couple more dolls for Alyssa, along with some other toys for the boys!  It's going to be a fun Christmas :-)

Also posting at Watson Handmade Christmas.

Wednesday, October 27, 2010

My Quilt!!

OMG!  I can't believe I finished it!!  I finished my quilt for my bed!!  I am so excited.

There is a special dear friend of mine, who desires to remain anonymous in this, that was given a bunch of quilting stuff from the family of a woman she knew that passed away.  Most of this stuff was quilts that were half pieced together but were never finished.  My friend told me that she did not have time to finish these quilts and wanted to know if I would be interested in any of them.

When I saw the pieces for this quilt I fell in love at first sight!!  It was beautiful and I quickly thought of my bed and how pretty it would be on my bed so I told her I would love to take it!!  I also took a few other projects...and am thinking my sister would maybe like to do some of them herself :-)  (she hasn't even heard about this until this post - HEE HEE!!)  But once again, the friend of mine wishes to remain anonymous in this and I am honoring her decision in that!

But look at my quilt!!


I finished piecing it together.  I added the solid blue around the edges.  I found some super soft high loft batting and some pretty natural color muslin fabric for the back side.   I am quite new to quilting so instead of trying to hand quilt it or even machine quilt this massive quilt I found some pretty blue and cream 1/8" satin ribbon and tie tacked it (I don't know if that is the correct term or not...sorry if it is not).

Here is a close up of one of the squares.


Now I just need to find (or make) some pretty shams and some new curtains for my room.  (my current curtains are white but the bed is cream)

My husband told me last night that he would like to make a custom headboard for our bed!!  I think that would be GORGEOUS!!!

I'm so excited!!!  I have wanted to make bedding for my room for quite some time now.  But it seems like other projects always send this one to the back burner!  I am so happy to finally have new bedding for my bed!!!  (even if I didn't completely make it by myself!)

Sunday, October 24, 2010

Another dress to skirt pattern

Here is another adorable dress that was just too small for Alyssa!

I cut off the bodice right above the waistine (so that I would not lose any of the skirt).  I folded the top cut off piece down and sewed a tube and inserted elastic to make an elastic top skirt.

I also took some of the bodice top (it was knit) and cut it into strips and serged the edges with the wooly nylon thread (stretching the fabric as I serged to create the ruffle effect) and used the strips to make a flower to sew on the skirt.

Here is the finished skirt.

And here is my precious model showing off her new skirt!!  She was all pretty and ready for church!


Related Posts Plugin for WordPress, Blogger...