Well I got Alyssa's Easter dress made! (it looks much better on her than it does on the hanger! I will upload pics of her wearing it Sunday sometime next week hopefully!!)
I used the Ellie Twirl Dress by Lilibelle that I purchased on youcanmakethis.com. I thankfully already had some adorable seersucker and matching solid purple coordinating fabric! I added a ruffle to the straps (along with a ribbon trim to the straps and the top of the bodice.
Here is the front:
And here's the back! Don't you just love that bow?!?!?
For my dress instead of making something new this year I decided to pull out a dress that I made about 8 years ago!! I haven't been able to wear it for quite some time because I had gained all that weight - but now that it is back off (and has stayed off!!!) I can wear it again! All I had to do was replace the broken zipper on it! This is still one of my favorite dresses that I have ever made!
Here is a close up of the bodice (sorry the picture turned out a bit blurry) but there is yellow decorative stitching around the neckline (and also the bottom hem)...it is tulips...the tulips were done on my embroidery machine using eyelet lace as appliquéd material for the petals.
Last year I made a decision that every year I would try to do something homemade for kids for Easter...why you ask? because I LOVE Easter! It is one of my favorite holidays and there are so many cute things you can do!
Last year I made bunny neck pillows and bunny hand puppets for the boys, and a bunny blanket for Alyssa. (I thought I blogged about it but can't seem to find the post)
This year I made bunny bean bags. I got the idea from here on family fun.com. I used fabric markers to make the facial features (less likely to fall off that way LOL!). I also used a 2nd rubberband to seperate the head from the body (instructions just called for a ribbon to do that). I hotglued a ribbon around the neck and then hotglued a bow on. (looked better than tying a bow around the neck. I had some cute craft pom poms to hot glue on for the tails!
Here are the front of the bunnies...
and here are the backs! :-)
I think these are going to look DARLING in their Easter baskets on Sunday!
I pray everyone has a Blessed Easter!! I will report back with pics of Alyssa in her dress next week :-)!
Welcome to my little corner of the web where I like to show off my love of sewing! I love to sew for my daughter and myself, and try to find things to make for my boys as well. I love to refashion clothes and I love to try to create new designs.
Thursday, April 21, 2011
Tuesday, April 19, 2011
The Princess Dress
Remember this post where I showed off the princess dress that I made??
Well I thought you might like to see Alyssa in that dress!! She loved the dress! It fit her perfectly!
And here is a view of the awesome dress up shoes!! (they were entirely too big but she didn't care! LOL!)
Everyone loved the dress! She even wore it to church the next day (without the bustle or pearls and flowers belt).
I am working on her Easter dress for Sunday!!! I was so excited to find a very cute pattern on youcanmakethis.com !!! If you haven't checked out that site you need to! (They have some GREAT patterns! The pattern that I tested (and blogged about here) is on that site as well! ) I was excited to already have some very cute fabric in my stash to use and can't wait to see the finished product!! (and yes of course I will share on here!)
Well I thought you might like to see Alyssa in that dress!! She loved the dress! It fit her perfectly!
And I can't believe she kept on the clip on earrings ALL DAY!!
Here is a view of the back of the dress with the bustle.
And here is a view of the awesome dress up shoes!! (they were entirely too big but she didn't care! LOL!)
Everyone loved the dress! She even wore it to church the next day (without the bustle or pearls and flowers belt).
I am working on her Easter dress for Sunday!!! I was so excited to find a very cute pattern on youcanmakethis.com !!! If you haven't checked out that site you need to! (They have some GREAT patterns! The pattern that I tested (and blogged about here) is on that site as well! ) I was excited to already have some very cute fabric in my stash to use and can't wait to see the finished product!! (and yes of course I will share on here!)
Thursday, April 7, 2011
Ruffled Shrug
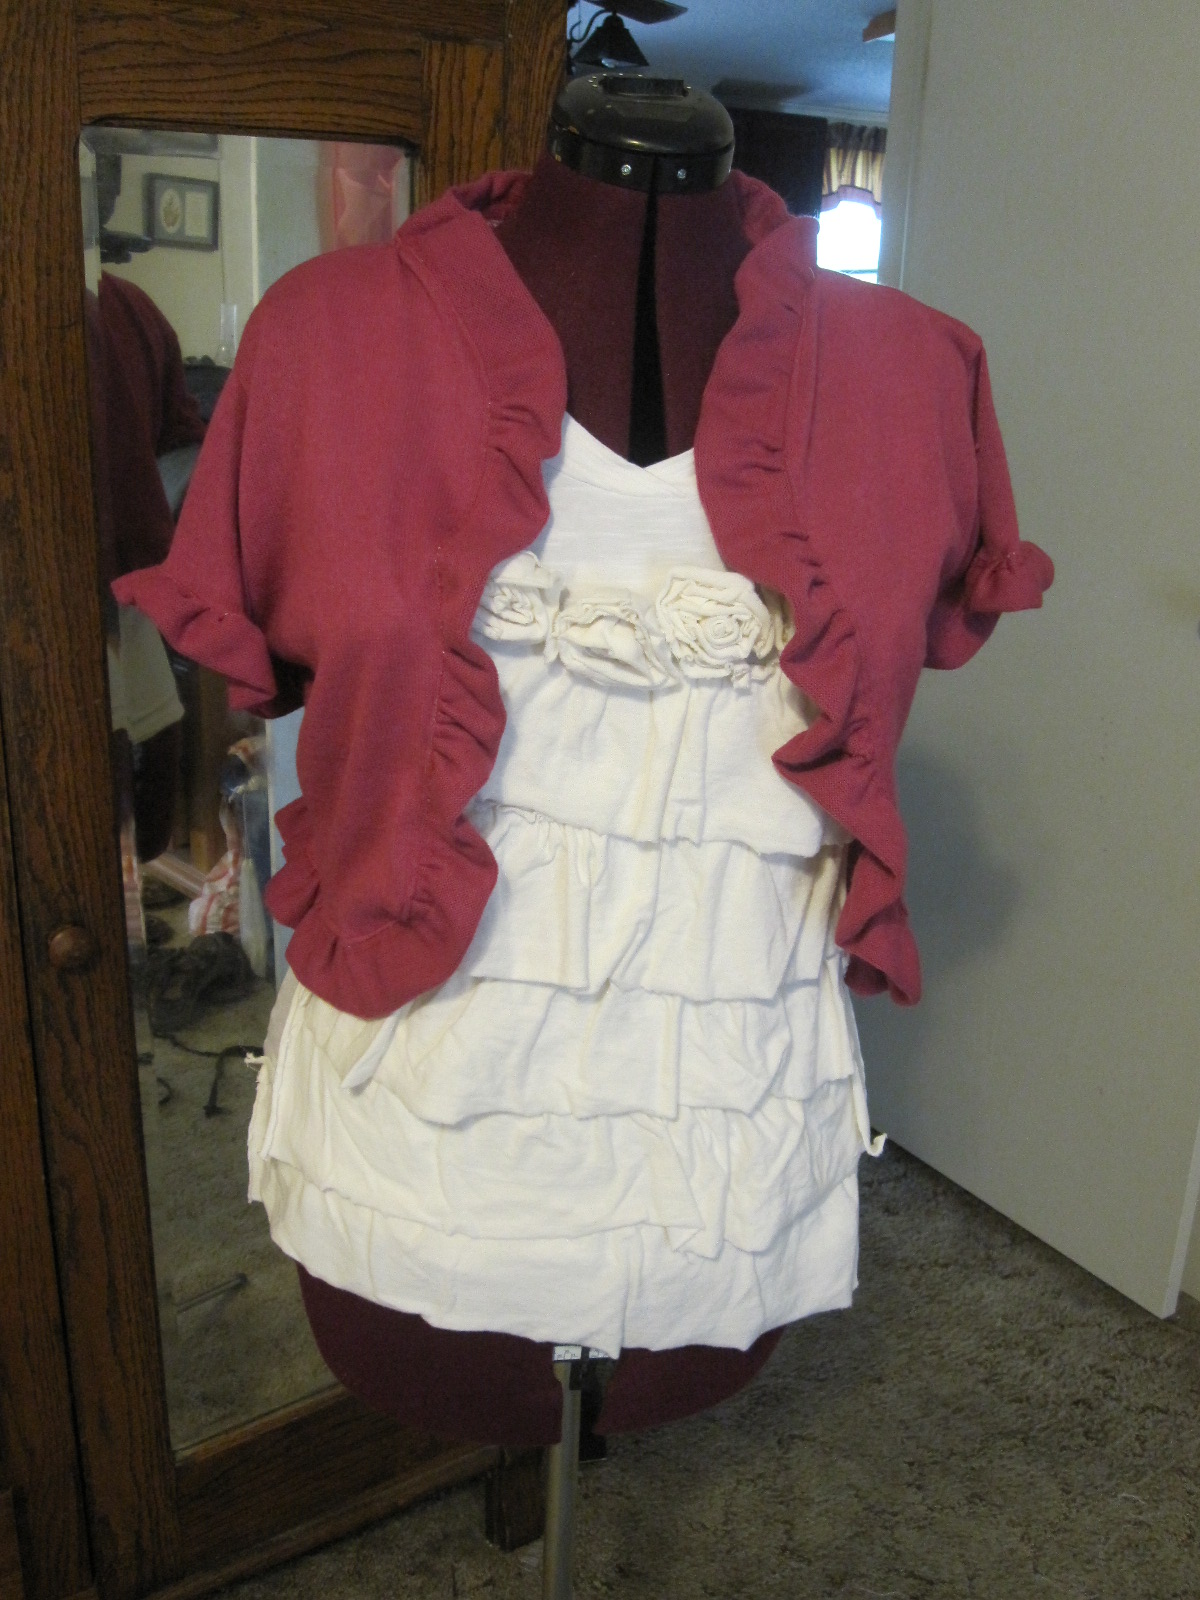
Here's my ruffled shrug I made today! I used another shrug I had as a pattern and then just added a ruffle all the way around and at the bottom of the sleeves.
The material is a soft very lightweight sweater material.
Here it is paired with my white ruffled shirt!
Yay!
The material is a soft very lightweight sweater material.
Here it is paired with my white ruffled shirt!
Yay!
Alyssa's Petticoat
Isn't it adorable?!?! It was so easy to put together too! I had some nice rose colored soft stretch knit fabric. I used one of her other skirts to know how big to make it. I cut out one long rectangle (by putting the skirt on the fold of the fabric and cutting out a rectangle the size of the skirt. I then cut three pieces of lace. Each piece was three times the width of the rectangle (so that I would have full ruffles - since this is a petticoat and fullness it what we are going for!). I gathered up the lace and sewed it to the rectangle. I then folded the rectangle (wrong side facing out and sewed the seam. I then folded over the top of the rectangle to make a casing for my elastic, sewed it and then inserted my elastic! I was done!! How easy was that!!!
Now her outfit is complete! It's my turn!! :-) Not doing too much. I just have some lightweight stretch knit sweater material in almost the same color of the dress. I am going to make a ruffled shrug to wear with my rose and ruffle shirt. Of course I will post pictures when I finish!! :-)
Wednesday, April 6, 2011
Alyssa's Princess Dress For Her Birthday
It is hard to believe that Alyssa is fixing to be two!! OMG!! Where does the time go??
Anyways - I am doing a princess party for her. If you are going to have a princess party you have to have a princess dress!
My mom said she wanted to buy the dress...but of course, being the sewer that I am, thought it would be funner to make her dress :-) So my mom bought all of the items needed to do so!
I wanted something that she could wear more than just for dress up play! So I decided to do the basic dress, that she could actually wear to church, and then do a dress-up layer (or what I call the "ball gown" layer) to wear to her princess party to play dress up in!
I used the tutorial I found here for the basic dress. I decided to do it in pink and white instead of yellow and white. I made the dress out of men's t-shirts. (it was a very sad fact that I found the pink color that I wanted in the men's t-shirt department! My sister and I looked all over the ladies department at Target, even in the intimates section, maternity, sleepwear, everywhere and not one good pink color t-shirt or jersey knit! But we did find it in the men's department. I know my husband would not be caught dead in this color t-shirt! LOL!)
Anyways, I bought 2 of the pink shirts and one white shirt. My pink shirts were size L. For her dress which is probably truly about a size 3T it took EVERY BIT of those two shirts...I would suggest buying larger sizes if you want to make this. :-)
So here is the basic dress...
When I first tried it on her it was a bit too long (went all the way to the floor) so I decided to pull up the sides. I made two fabric flowers and attached them to safety pins and used that to "tack" the dress up (this way as she grows the dress will grow with her). I really liked the result of how it looked though with the sides pulled up like that! I think it really added to the dress. Here is a picture from my phone of the dress before I tacked the sides so you can see the difference.
Here is a close up of the top. It is a peasant style top and I shirred the neck and arms instead of doing elastic! I liked the shirred look better. I just used some eyelet lace trim that I got on clearance at Wal-Mart for the collar. I used an elastic hoop in the middle to gather the collar at the middle. This also sets the necklace in place (so she won't be so apt to play with it...but lets the necklace be removed before the dress is washed.)
For the "ball gown" layer I found a elastic and jersey knit braid headband on clearance at Wal-Mart for $1!! (it was actually a set of 3 headbands - so two for Alyssa to wear and one to use for this project! What a deal!!) It fit very well around her tiny waist!! :-) I thought it would be perfect to attach the embellishments on to add flair to her dress for her party!
In the front I added pearls and fabric roses. In the back I added a ruffl knit and lace bustle!!
Here is the front of the dress with the added layer.
Here is the back of the dress with the bustle!
Here is just that layer to show you what I am talking about!
Here is a close up showing you the headband that I used.
Here are other items that were bought to go with the dress for her princess party!
Her dress up shoes!! (yes they will be a bit big on her but aren't dress up shoes suppose to be big?? She is going to go crazy over these!! She loves shoes!!)
Here is her birthday girl tiara!! Can't be a princess without a tiara.
It even came with clip on earrings! How fun!!!
And here is her bracelet that matches the necklace on her dress (the necklace and the bracelet were on the $1 aisle at Target!)
And I have decided to make a petticoat to go under the dress to make it poof out even more! I was trying ot figure out if I had material on hand to do this with and remembered that some time back my grandmother gave me 124 YARDS of lace!! It sits in the top of my closet because I have not found much to do with it. I have used a little here and there...but not much of it! I think it will work perfect for a little girl petticoat!! The wheels in my head are turning to figure out how to make this so that it can grow with her because a little girl will always need a petticoat, right?!? :-)
So more on that later!!
I can't wait to see Alyssa all dressed up in her princess dress!! I will make sure I share pictures!
Another thing I am trying to decide is what to do for the cake! Do I use the cake pan I have to make a princess doll cake (using a Barbie doll) or do I make a castle cake (you know with the sugar cones)??
Well I guess I better go...I have lots of thinking and planning to do still!!
Anyways - I am doing a princess party for her. If you are going to have a princess party you have to have a princess dress!
My mom said she wanted to buy the dress...but of course, being the sewer that I am, thought it would be funner to make her dress :-) So my mom bought all of the items needed to do so!
I wanted something that she could wear more than just for dress up play! So I decided to do the basic dress, that she could actually wear to church, and then do a dress-up layer (or what I call the "ball gown" layer) to wear to her princess party to play dress up in!
I used the tutorial I found here for the basic dress. I decided to do it in pink and white instead of yellow and white. I made the dress out of men's t-shirts. (it was a very sad fact that I found the pink color that I wanted in the men's t-shirt department! My sister and I looked all over the ladies department at Target, even in the intimates section, maternity, sleepwear, everywhere and not one good pink color t-shirt or jersey knit! But we did find it in the men's department. I know my husband would not be caught dead in this color t-shirt! LOL!)
Anyways, I bought 2 of the pink shirts and one white shirt. My pink shirts were size L. For her dress which is probably truly about a size 3T it took EVERY BIT of those two shirts...I would suggest buying larger sizes if you want to make this. :-)
So here is the basic dress...
When I first tried it on her it was a bit too long (went all the way to the floor) so I decided to pull up the sides. I made two fabric flowers and attached them to safety pins and used that to "tack" the dress up (this way as she grows the dress will grow with her). I really liked the result of how it looked though with the sides pulled up like that! I think it really added to the dress. Here is a picture from my phone of the dress before I tacked the sides so you can see the difference.
Here is a close up of the top. It is a peasant style top and I shirred the neck and arms instead of doing elastic! I liked the shirred look better. I just used some eyelet lace trim that I got on clearance at Wal-Mart for the collar. I used an elastic hoop in the middle to gather the collar at the middle. This also sets the necklace in place (so she won't be so apt to play with it...but lets the necklace be removed before the dress is washed.)
For the "ball gown" layer I found a elastic and jersey knit braid headband on clearance at Wal-Mart for $1!! (it was actually a set of 3 headbands - so two for Alyssa to wear and one to use for this project! What a deal!!) It fit very well around her tiny waist!! :-) I thought it would be perfect to attach the embellishments on to add flair to her dress for her party!
In the front I added pearls and fabric roses. In the back I added a ruffl knit and lace bustle!!
Here is the front of the dress with the added layer.
Here is the back of the dress with the bustle!
Here is just that layer to show you what I am talking about!
Here is a close up showing you the headband that I used.
Here are other items that were bought to go with the dress for her princess party!
Her dress up shoes!! (yes they will be a bit big on her but aren't dress up shoes suppose to be big?? She is going to go crazy over these!! She loves shoes!!)
Here is her birthday girl tiara!! Can't be a princess without a tiara.
It even came with clip on earrings! How fun!!!
And here is her bracelet that matches the necklace on her dress (the necklace and the bracelet were on the $1 aisle at Target!)
And I have decided to make a petticoat to go under the dress to make it poof out even more! I was trying ot figure out if I had material on hand to do this with and remembered that some time back my grandmother gave me 124 YARDS of lace!! It sits in the top of my closet because I have not found much to do with it. I have used a little here and there...but not much of it! I think it will work perfect for a little girl petticoat!! The wheels in my head are turning to figure out how to make this so that it can grow with her because a little girl will always need a petticoat, right?!? :-)
So more on that later!!
I can't wait to see Alyssa all dressed up in her princess dress!! I will make sure I share pictures!
Another thing I am trying to decide is what to do for the cake! Do I use the cake pan I have to make a princess doll cake (using a Barbie doll) or do I make a castle cake (you know with the sugar cones)??
Well I guess I better go...I have lots of thinking and planning to do still!!
Labels:
Alyssa dresses,
birthday,
dress up,
peasant top,
princess dress
Monday, March 28, 2011
I got to test a pattern!
If you actually read these posts on my blog you will notice on the right hand column a button for Seamingly Smitten!! I absolutely love this blog! Jenny always comes up with the cutest patterns for herself and her children! She is very friendly and always very complimentary!
Anyways - she has started marketing her own patterns. She asked for pattern testers a few weeks ago and I was a bit bummed because I was going to be out of that town that week and would not be able to cooperate! I was so very excited to see though this morning that she had another pattern that she was wanting testers for. I jumped at the chance this time and got chosen to be a tester!! WHOO HOO!! I was so excited that I completed the pattern this afternoon - LOL!! I thankfully had all the materials on hand and it was a very simple and fast pattern! I completed the project from start to finish in 2 hours (and that was with the usual interruptions that happen when you have 3 kids in the house!) I had not been feeling really well (probably exhausted from all the many travels that have been happening lately) but this really put a jump back in my step and helped me cheer up! (maybe I was having sewing withdrawals - it has been 3 weeks since I have been able to sew because of everything going on!)
Anyways! This was a super cute pattern and it worked perfectly for Alyssa! Her size fit her perfect!
So here's the end result!! What do you think!?! (oh the fabric I chose was a seersucker with ladybugs and daisies. The ruffle trim and the tie are a lightweight denim).
And my mom bought all the stuff for me to make Alyssa's princess dress for her 2nd birthday coming up!!! I can't wait to see the end result. I have in my head what I want to do!! I hope it turns out as adorable as the picture in my mind! LOL!! Of course I will share on here the end results!
I am also starting to think of what to do for Easter dresses!!! I don't have long to get that done either!
Anyways - she has started marketing her own patterns. She asked for pattern testers a few weeks ago and I was a bit bummed because I was going to be out of that town that week and would not be able to cooperate! I was so very excited to see though this morning that she had another pattern that she was wanting testers for. I jumped at the chance this time and got chosen to be a tester!! WHOO HOO!! I was so excited that I completed the pattern this afternoon - LOL!! I thankfully had all the materials on hand and it was a very simple and fast pattern! I completed the project from start to finish in 2 hours (and that was with the usual interruptions that happen when you have 3 kids in the house!) I had not been feeling really well (probably exhausted from all the many travels that have been happening lately) but this really put a jump back in my step and helped me cheer up! (maybe I was having sewing withdrawals - it has been 3 weeks since I have been able to sew because of everything going on!)
Anyways! This was a super cute pattern and it worked perfectly for Alyssa! Her size fit her perfect!
So here's the end result!! What do you think!?! (oh the fabric I chose was a seersucker with ladybugs and daisies. The ruffle trim and the tie are a lightweight denim).
And my mom bought all the stuff for me to make Alyssa's princess dress for her 2nd birthday coming up!!! I can't wait to see the end result. I have in my head what I want to do!! I hope it turns out as adorable as the picture in my mind! LOL!! Of course I will share on here the end results!
I am also starting to think of what to do for Easter dresses!!! I don't have long to get that done either!
Monday, March 7, 2011
Spring Refashion - From Onesies to Shirts
Aren't all of these tops just too cute?!?! All of these, plus a few more that are not pictured, were originally onesies that I refashioned into shirts! This project included 9 onesies and took about 2 hours to complete ALL of them!! (which means it took about 10 to 15 minutes for each one!! VERY EASY!!)
On all of the onesies I used my rotary cutter to cut off the onesies just above the bottom binding, as seen in the picture below.
There were a couple that were long enough at that point so I just did a rolled hem at the bottom edge with my serger and called it good enough! I didn't get pictures of these since they were just a simple cut and hem.
But most of them were a bit short so they needed a length added to them.
On most of those I did a lettuce edge at the bottom of the cut off onesie and then added a gathered ruffle (made from strips of old t-shirts of mine). I top stitched the onesie to the ruffle to give a cute layored effect.
There were a couple that put a double layer of ruffles behind the onesie! I really liked the look of these!
On one of the onesies I sewed the ruffled extension to the bottom instead of layering it (mainly because I was being lazy at that point and did not want to change my serger thread from the pink that was in it for the other shirts...and this shirt had no pink). But I still think it turned out cute like this as well.
And then I had one onesie that I instead of putting a ruffle at the bottom I used the bottom of another shirt that was too short to extend the length. And I cut out the flower detail that was at the top of the other shirt and sewed it to the top of this shirt. It turned out to be a fun little shirt! (I also used the method of doing a lettuce edge at the bottom of the cut onesie and sewing the extension behind it for the layered effect)
I love now quick and easy these came together!! In two hours Alyssa had 9 new shirts that fit!!! :-) (and look adorable as well!!)
On all of the onesies I used my rotary cutter to cut off the onesies just above the bottom binding, as seen in the picture below.
There were a couple that were long enough at that point so I just did a rolled hem at the bottom edge with my serger and called it good enough! I didn't get pictures of these since they were just a simple cut and hem.
On most of those I did a lettuce edge at the bottom of the cut off onesie and then added a gathered ruffle (made from strips of old t-shirts of mine). I top stitched the onesie to the ruffle to give a cute layored effect.
There were a couple that put a double layer of ruffles behind the onesie! I really liked the look of these!
On one of the onesies I sewed the ruffled extension to the bottom instead of layering it (mainly because I was being lazy at that point and did not want to change my serger thread from the pink that was in it for the other shirts...and this shirt had no pink). But I still think it turned out cute like this as well.
And then I had one onesie that I instead of putting a ruffle at the bottom I used the bottom of another shirt that was too short to extend the length. And I cut out the flower detail that was at the top of the other shirt and sewed it to the top of this shirt. It turned out to be a fun little shirt! (I also used the method of doing a lettuce edge at the bottom of the cut onesie and sewing the extension behind it for the layered effect)
I love now quick and easy these came together!! In two hours Alyssa had 9 new shirts that fit!!! :-) (and look adorable as well!!)
Subscribe to:
Posts (Atom)